Telepointer Trails: A Windows Forms Application Using Janus
From EQUIS Lab Wiki
Contents |
Introduction
In this application we use Janus to synchronize telepointer positions. This example demonstrate the following features of Janus:
- Using the dedicated Server
- Synchronizing a user defined class
- Retrieving values at different times

Getting Started
Begin by downloading the Janus Toolkit.
Open the Janus solution with Visual Studio 2012 and build the solution.
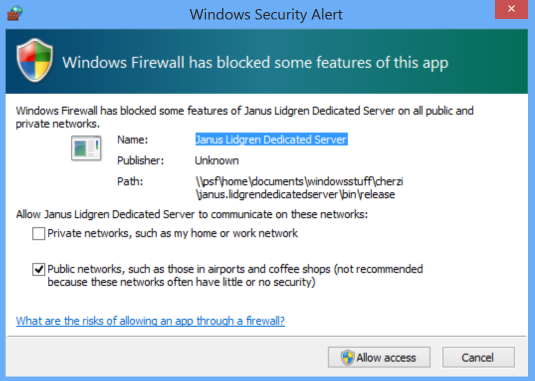
Start the Janus Lidgren DedicatedServer. If this is the first time you have run the server, you will be see a Windows Security Alert. You must Allow Access for the server to function.

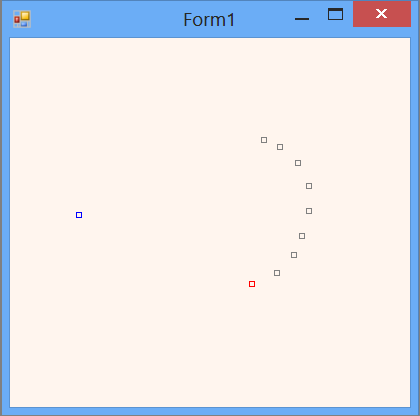
Start two copies of the Telepointer application (found in the Demos folder). Move the mouse over one of the windows and observe the position and mouse tail displayed in both windows.
Now that you have run the application, we will have a closer look at the programs. First the Janus Lidgren Dedicated Server
The Janus Lidgren Dedicated Server
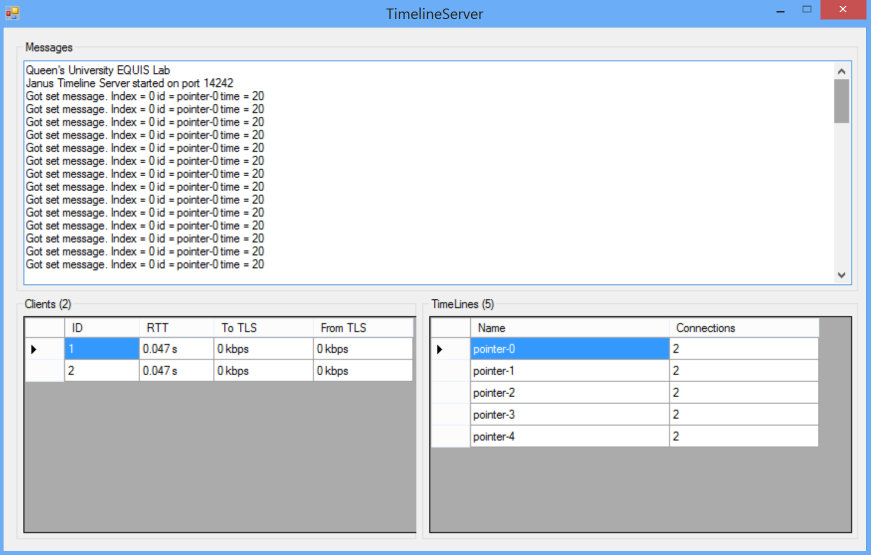
The Janus Lidgren Dedicated Server passes messages between Janus clients that are connected to the server. The standalone server can be useful for debugging issues with Janus as it displays information about the status of the connections. The form is divided into three sections. The top section show a running log of set messages. On the bottom left, we see which clients are connected to the server and the round trip time for messages between the client and the server (in the future it will also show the traffic volume). On the bottom right, we see a list of all the timelines and the number of clients connected to each one.

The server creates handlers for all the events generated by the timeline synchronizer, and then it starts the timeline server.
   public ServerForm()
   {
       InitializeComponent();

       TimelineServer.ServerStarting += OnServerStarting;
       TimelineServer.TimelineSynchronizer.PeerConnected += OnPeerConnected;
       TimelineServer.TimelineSynchronizer.PeerDisconnected += OnPeerDisconnected;
       TimelineServer.TimelineSynchronizer.PeerUpdated += OnPeerUpdated;
       TimelineServer.TimelineSynchronizer.TimelineCreated += OnTimelineCreated;
       TimelineServer.TimelineSynchronizer.TimelineUpdated += OnTimelineUpdated;
       TimelineServer.TimelineSynchronizer.TimelineDestroyed += OnTimelineDestroyed;
       TimelineServer.TimelineSynchronizer.TimelineSet += OnTimelineSet;

       TimelineServer.Start(true);
   }
All the handlers are set up similarly, so we will just have a closer look at one of them. The issue is that the events are generated in a different thread than the handler.
When an event is initiated from the timeline synchronizer, and the OnPeerConnected method is invoked, this.messageText.InvokeRequired is true. The OnPeerConnected method then invokes itself again and this time this.messageText.InvokeRequired is false and we can do something on the form. In this case, we add a new row to the grid at the bottom left of the form and update the number of clients in the grid heading.
   private void OnPeerConnected (ushort index)
   {
       if (this.messageText.InvokeRequired)
       {
           Invoke(new PeerConnectedHandler(OnPeerConnected), new object[] { index });
       }
       else
       {
           clientGrid.Rows.Add(new object[] { index.ToString() });
           clientGroup.Text = "Clients (" + clientGrid.Rows.Count + ")";
       }
   }
The Telepointer Client Form
This application demonstrates how to synchronize a user defined class.
Position - A User Defined Timeline Class
We have created a class Position, that is used to synchronize the telepointer positions. Position consists of two fields x and y.
   public class Position
   {
       public int x;
       public int y;

       public Position(int _x, int _y)
       {
           x = _x;
           y = _y;
       }
   }
If this is all we did, we could create a timeline of type Position and we could synchronize Position objects between clients. However it would not work very well. First, it would use XML serialization to convert the object to a byte array for transmitting values over the network which is very inefficient and could quickly consume all available bandwidth if we created many objects. Second, it could not interpolate between position value and would default to using stepwise interpolation and extrapolation. This could result in jerky animation on the remote clients.
First we will look at the encoding and decoding methods that can be used to override the default XML serialization. There are many possible ways to do this. In this example, we use a BinaryWriter to convert a Position object to and from a byte array. We also need to tell our Timeline<Position> class to use these encoding and decoding functions. However, that is not done here and will be described later.
   public static byte[] EncodePosition(Position value)
   {
       byte[] bytes = new byte[2 * sizeof(Int32)];
       BinaryWriter bw = new BinaryWriter(new MemoryStream(bytes));
       bw.Write(value.x); bw.Write(value.y);
       bw.Close();
       return bytes;
   }

   public static Position DecodePosition(byte[] bytes)
   {
       BinaryReader br = new BinaryReader(new MemoryStream(bytes));
       var value = new Position(br.ReadInt32(), br.ReadInt32());
       br.Close();
       return value;
   }
Next, we will look at how to implement linear interpolation (and extrapolation). This is only required if you want to be able to interpolate between values in the timeline. Janus contain a BuildLinearInterpolator method that will generate a linear interpolation method for any class. However you need to tell the BuildLinearInterpolator method how to Add two objects and how to Multiply an object by a floating point value. The easiest way to do this to create an Add and a Multiply method.
   public static Position Add(Position pos1, Position pos2)
   {
       return new Position(pos1.x + pos2.x, pos1.y + pos2.y);
   }
   public static Position Multiply(Position pos, float v)
   {
       return new Position((int) (v * (float)pos.x), (int) (v * (float)pos.y));
   }
Finally, we need to tell Position Timelines which encoding, decoding and interpolation methods to use. Here we put it all together in one function that can be called from our main form.
   public static void SetDefautTimelineFunctions()
   {
       Timeline<Position>.TypeEncode = EncodePosition;
       Timeline<Position>.TypeDecode = DecodePosition;

       Timeline<Position>.TypeInterpolate = TimelineUtils.BuildLinearInterpolator<Position>
                                          ((x, y) => Position.Add(x,y), (x, y) => Position.Multiply(x, y));
   }
Note: similar to the BuildLinearInterpolator method, there is a BuildLinearExtrapolator method and also BuildQuadraticInterpolator and BuildQuadraticExtrapolator methods.
The Form Application
The form begins by starting the timeline client and waiting until the client connects.
   private void Form1_Load(object sender, EventArgs e)
   {
       TimelineClient.Start(true, true);

       while (!TimelineClient.IsConnected)
       {
           System.Threading.Thread.Sleep(300);
       }
Next, we set the default encoding, decoding and interpolation functions for the position timelines, by calling the SetDefautTimelineFunctions method we created earlier.
Position.SetDefautTimelineFunctions();
This sets the encoding, decoding and interpolation functions for all timelines of type position, and it must be called before any position timelines are created. Alternatively, the encoding, decoding, interpolation and extrapolation functions can be set individually for each position timeline. In this case, we use the Encode, Decode, Interpolate and Extrapolate methods instead for the TypeEncode, TypeDecode, TypeInterpolate and TypeExtrapolate methods. For example, if myPositionTimeline is a position timeline, we could use:
myPositionTimeline.Encode = EncodePosition;
instead of
Timeline<Position>.TypeEncode = EncodePosition;
Now we create an array to hold all our timelines and create a position timeline for each client. By default only the last 10 values are stored in a timeline. Because we want to show a tail following our telepointer, we will increase the maximum number of entries to 30.
       pointerPosition = new Timeline<Position>[MAX_CLIENTS];
       for (int i = 0; i < MAX_CLIENTS; i++)
       {
            pointerPosition[i] = TimelineManager.Default.Get<Position>("pointer-" + i);
            pointerPosition[i].MaxEntries = 30;
}
As the last step in loading the form, we store the timeline client index value that we get from the timeline synchronizer and later use it to determine which of the position timeline represents which client's mouse position. The index numbers start at 1, so we subtract 1 because our timeline array starts at 0.
       myClientNumber = TimelineClient.Index - 1;
   }
Now let's look at setting values into the timeline. We do this on the MouseMove event.
   private void Form1_MouseMove(object sender, MouseEventArgs mouseEv)
   {
       pointerPosition[myClientNumber][0] = new Position(mouseEv.X, mouseEv.Y);
   }
We then use the TimerTick event to draw the telepointers. First, we set up the graphics. The we loop through all the possible telepointers and get the position at 0.1s, 0.2s,...1.0s in the past and draw these positions in grey. Then we get the position at time 0 (now) and draw it in red if it is our position and in blue if it belongs to another client.
Some details worth noting:
- pointerPosition[i].IsEmpty is used to check if there are any values in the timeline
- pointerPosition[i][(double)(j *(-0.1))] accesses positions in the past at 0.1 s time increments
- pointerPosition[i][0] gets the position now.
   private void timer1_Tick(object sender, EventArgs e)
   {
       Graphics gfx = CreateGraphics();
       gfx.Clear(Color.SeaShell);

       Position cursorPosition;
       for (int i = 0; i < MAX_CLIENTS; i++)
       {
           if (pointerPosition[i] != null)
           {
               if (!pointerPosition[i].IsEmpty)
               {
                   for (int j = 1; j <= 10; j++)
                   {
                         cursorPosition = pointerPosition[i][(double)(j *(-0.1))];
                         gfx.DrawRectangle(new Pen(Color.Gray), cursorPosition.x, cursorPosition.y, 5, 5);
                   }
                   cursorPosition = pointerPosition[i][0];
                   Color tpc = i == myClientNumber ? Color.Red : Color.Blue;
                   gfx.DrawRectangle(new Pen(tpc), cursorPosition.x, cursorPosition.y, 5, 5);
               }
           }
       }
   }
